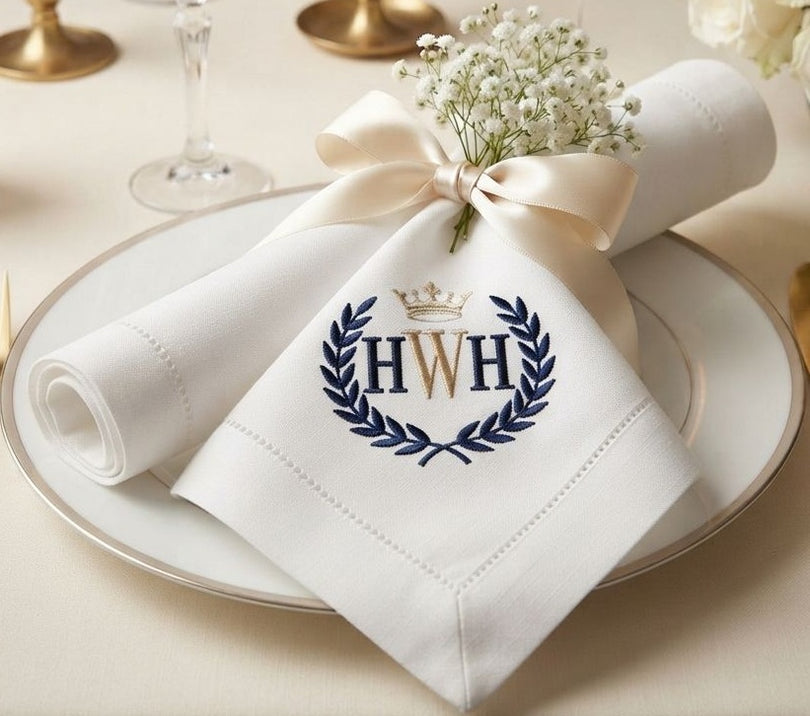

Embroidery is the most durable and formal option and holds up to repeated washing, making it the best choice for wedding or heirloom napkins. Printing and heat-transfer vinyl are faster and cheaper, better suited to one-time events like birthdays or showers. If you're monogramming with initials, the traditional order for a three-letter monogram is first name, last name, and middle name, with the last-name initial larger in the center.
Choosing a Personalization Method
|
Method |
Durability |
Best for |
Approx. turnaround |
|
Embroidery |
Highest; withstands years of washing |
Weddings, heirloom gifts, everyday linen napkins |
Longest (hand or machine stitching time) |
|
Heat transfer vinyl (HTV) |
Moderate; can crack or peel after repeated washing |
One-time events, birthdays, showers |
Fast |
|
Screen/spot printing |
Moderate, fades gradually |
Bulk orders, corporate events |
Fast (best for large quantities) |
|
Foil stamping |
Low durability, decorative only, typically single-use |
Paper napkins for formal one-time events |
Fast |
|
Hand stamping |
Low, ink-dependent |
Casual DIY projects, paper or cloth |
Fastest |
Understanding Monogram Order and Etiquette
If you're adding initials rather than a full name, the order matters more than most people expect, and getting it wrong is the most common personalization mistake.

-
Three-letter monogram (traditional): Reads first name, last name, and middle name, with the last name initial larger and centered. For example, Sarah Anne Jones becomes S J A, with the J enlarged.
-
Three-letter monogram (block style): All three letters the same size, in natural reading order: first, middle, and last. Sarah Anne Jones becomes S. A. J.
-
Two-letter monogram: Typically the first- and last-name initials, the same size, in natural order. Common when there's no middle name or for a more casual look.
-
Single-letter monogram: Traditionally the last-name initial for formal or household items like napkins and towels; the first-name initial is a friendlier option for casual or gifted pieces.
-
Couples' monograms: The most common format centers the shared last-name initial, with each partner's first-name initial on either side (for example, a couple named Lisa and David Reed would read L R D).
There's no single "correct" rule enforced anywhere; these are conventions, not requirements. The one practical tip that matters: once you settle on an order for one set of napkins, keep it consistent across any matching tablecloths, placemats, or napkin rings you personalize.
Find Out: What Is the 5 Year Anniversary Gift | Top Gift Ideas
How to DIY Personalize Napkins at Home
Stamping (easiest, no sewing required)
-
Choose a fabric-safe ink pad and a rubber stamp with your design or initial.
-
Lay the napkin flat on a hard, protected surface.
-
Press the stamp firmly and evenly for 3–5 seconds; rocking or sliding the stamp will blur the design.
-
Let the ink dry fully (check your ink's label, typically 24 hours) before heat-setting with a dry iron on a low setting, ironing over a thin cloth to protect the design.
Heat Transfer Vinyl (no sewing, more polished result)
-
Cut your design or initials from heat transfer vinyl using a cutting machine or precise scissors.
-
Peel away the excess vinyl, leaving only your design on its backing sheet.
-
Position the design on the napkin; see placement guidance below.
-
Press with a household iron or heat press at the temperature specified for your vinyl (usually around 300–320°F), holding firm pressure for 10–15 seconds.
-
Let it cool fully before peeling back the carrier sheet.
Embroidery (most durable, most time)
-
Choose your design: a single initial or simple monogram is the easiest starting point.
-
Hoop the fabric to keep it taut and prevent puckering.
-
Outline the letter shape first with a split or chain stitch, then fill using a satin stitch for a clean, raised finish.
-
Secure your thread ends with a small knot on the underside rather than a loose tail, since napkins get washed repeatedly.
If any of this sounds like more time than you have before an event, ordering pre-personalized napkins is often the more practical route; see the comparison further down.
Where to Place Your Design
Placement should match how you plan to fold or display the napkin:
-
Corner placement: roughly 1–1.5 inches in from each edge is the standard spot for a monogram on a napkin that will be folded into quarters or a pocket fold, so the design sits visible on top.
-
Center placement: best for napkins displayed flat or fan-folded, where a corner design would be hidden in the fold.
-
Bottom-edge placement: common for napkins that will be rolled or tied with a napkin ring, so the design shows on the visible band.
Design Ideas by Occasion
Weddings: Soft, romantic colors with names, initials, or a wedding date. Script fonts and metallic thread or foil are the most requested combination, and they photograph cleanly against white or ivory linen.
Birthdays: Bright colors, playful mottos, or inside jokes work well; this is the one occasion where personalization can be fun rather than formal.
Baby showers: Pastels, the baby's name, or simple icons (a moon, a star, or a small animal) in a soft color palette.
Corporate events: A logo in brand colors, kept to a single color where possible to keep printing or embroidery costs down and the look clean.
Choosing the Right Napkin Material
-
Linen: The most durable option for embroidery specifically, and the standard choice for weddings and formal dinners because it holds a crisp fold and softens rather than wears out over repeated washing.
-
Cotton: Softer from the first wash, a strong middle-ground choice for showers and smaller gatherings where a slightly more casual, warm look fits.
-
Recycled paper: Best for large, single-use events where reusability isn't the goal; budget-friendly and works well with stamping or printing rather than embroidery.
Know About: What Is a Window Treatment? Styles & Uses Explained
Napkin Sizes for Personalization
Standard cloth napkin sizes, by occasion:
|
Napkin Size |
Dimensions |
Common Use |
|
Cocktail Napkin |
10" x 10" |
Appetizers, drinks, small bites |
|
Luncheon Napkin |
14"–16" square |
Casual lunches, tea parties, showers |
|
Dinner Napkin |
18"–20" square |
Everyday dinners, semi-formal settings |
|
Formal Napkin |
20"–22" square |
Formal dinners, holiday meals, weddings |
|
Banquet Napkin |
24" square |
Large events, banquets, restaurants |
Smaller sizes work best for light meals or casual setups; larger sizes give you more room for a decorative fold and a more formal presentation.
DIY vs. Ordering Pre-Personalized Napkins
|
Factor |
DIY |
Pre-personalized (ordered) |
|
Time investment |
Hours to days, depending on method and quantity |
None arrive ready to use |
|
Consistency across a set |
Harder to keep uniform by hand |
Guaranteed consistent |
|
Best for |
Small quantities, personal keepsakes, hands-on hosts |
Weddings, bulk events, corporate orders |
|
Upfront cost |
Lower for materials alone |
Higher per napkin, but includes labor and consistency |
|
Skill required |
Varies by method |
None |
If you're personalizing more than a handful of napkins, or you need them for a wedding or corporate event where consistency matters, ordering pre-personalized napkins is usually the more practical choice. Shop custom napkins
Overview
The method you choose comes down to how much time you have and how long you need the napkins to last. For anything permanent or formal, embroidery with a correctly ordered monogram is worth the extra time. For a one-time event, printing or heat transfer vinyl gets you a polished look fast. And if you'd rather skip the process altogether, All Cotton and Linen's custom napkins cover embroidered, printed, and monogrammed options in bulk, with consistent results across the whole set.